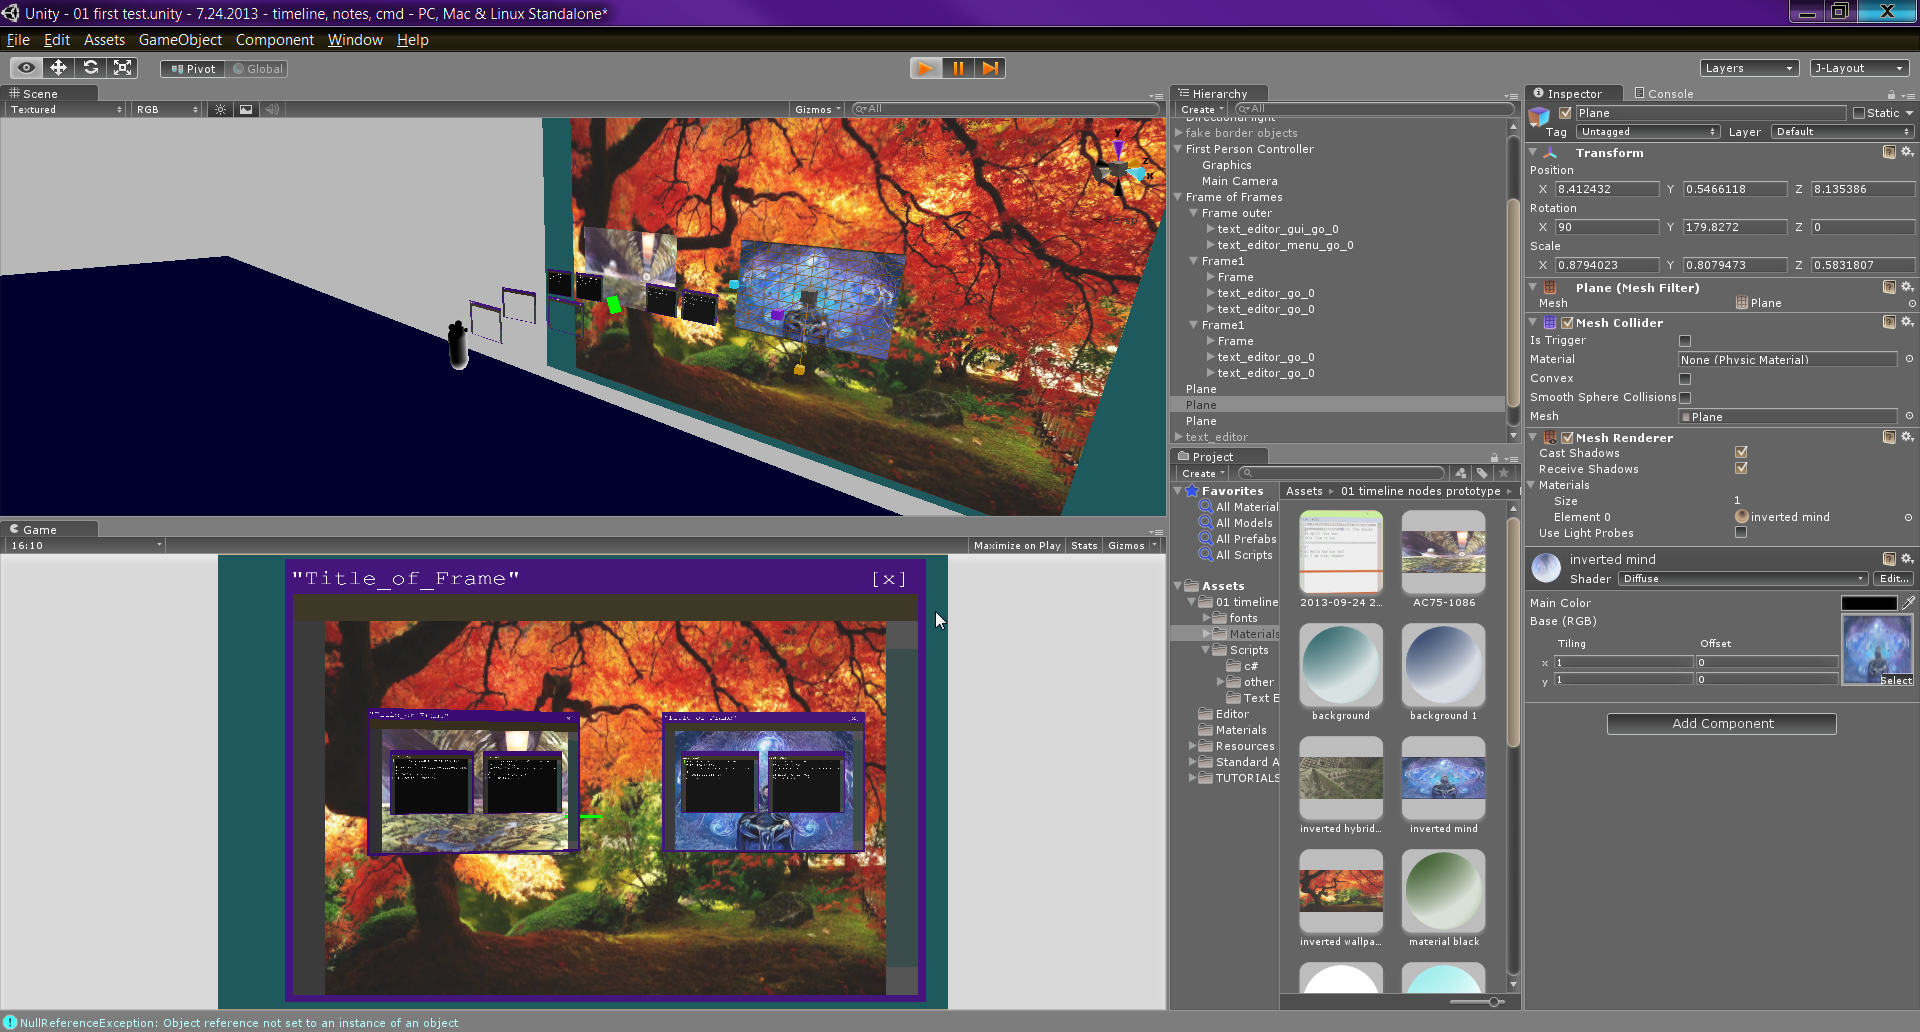
Made back in 2013. My first large experiment.
Windows can be dragged, zoomed, grouped,
typed into, saved and loaded.
Built in the Unity game development environment,
and written in "UnityScript" (a language loosely based on
JavaScript). I later ported it to C# in 2014 in order to have better support
for polymorphism
and subtyping.
My initial plan was to build a framework for AR and VR (Augmented
Reality and Virtual Reality), but integrating further support for web, video, audio, and
other media seemed like it was going to be a laborious task. So I decided to move on and build
on top of platforms where I could easily work with existing files and code libraries, instead of
writing each media utility from the ground up.
It was an incredibly fun project, and it was my first big trial by fire where I learned how to
better manage and organize large complex projects.
In my first iteration, I had windows in the same plane (parallel to the screen, all the same
distance away from the camera). This caused severe visual glitches whenever portions of two or
more windows overlapped. I was new to Unity and game engines and 3D,
and if there was a workaround for this, I was unable to discover it at the time. To
remedy this, I ended up learning a lot about 3D vector math.
[~] note to self, add diagrams here.
I spaced windows away from the others, giving each its own plane in 3D. Then they could move around
the user's screen without any anomalies nor visual chimera glitches. But placing windows further
from the camera makes them smaller. So as windows are placed further away, they are proportionally
resized to maintain the appearance that all of the windows were located in the same "Desktop" plane.
When I move back to working on 3D interfaces again, I may revisit this project, clean it with
the better practices I now know, and upload a version of source code which can run on modern
versions of Unity. But likely I will instead make a more elegant solution than this one. It was
an incredible learning experience though.
⇧ click a section to expand
Rich Text Editor in Godot
My current project.
A subset of a larger system I'm working on in Godot.
Currently on hold. I'll be returning to this after I finish this
website and secure a job.
More details, tutorials, and full code will be available in the
Documentation section of this website when it's done.
Each letter is a node, and each line is a node containing zero or more letters.
Letters contain internal data for their foreground and background color,
their font name, their font size, and their style.
The window itself currently has its graphical style hardcoded, but I plan to extend this (much later).
Clicking within the window will activate it, and place the text cursor at the mouse position.
Clicking and dragging the mouse will select a region of text.
(You can also select text by holding SHIFT and pressing: the arrow keys, HOME button, and the END button.)
When CTRL is held down before the user clicks the window, the window functions differently:
Holding CTRL and left-click dragging will move the window.
Holding CTRL and right-click dragging will resize the window.
(The direction of the resize depends on the quadrant of the window clicked.
If the user holds CTRL, right-clicks on the leftmost side of the window,
then drags out, the rightmost side of the window will stay where it is,
and the leftmost side will follow the mouse and expand or contract.)
Any action which changes the document is called
through a COMMANDS class, which creates an Action object to track changes.
After an Action object is created, its Action.do() function is called, then the Action object is pushed
onto an undo stack. When the user presses the hotkey for undo (CTRL+Z), the Action object is popped,
its Action.undo() function is called, and the Action object is pushed onto the redo stack.
Linux Framebuffer Windowing System
Due to the Coronavirus pandemic, I don't presently have access to this code, but I will upload images of it when I am able.
Written in C, then ported to C++. Runs in a Linux terminal, and plots individual pixels to the
screen. Keyboard input only.
Windows can be moved and resized. Windows contain lines and headers (which contain sub-sections of
more headers and lines). Headers can be folded and expanded, allowing quick navigation between dense
sets of hierarchical data without ever taking your hands off the keyboard.
In this app the screen is rendered from blocks, like a chess board. The screen's grid of blocks does
not change location nor size, but behind it is a canvas (which can move
around) filled with windows and lines and characters (which can
also move around). Think of the screen's grid like a camera fixed in place while people move
around within (or outside of) its view. Every time the program
paints pixels to the screen, the screen's grid "camera" takes a snapshot of blocks it can currently
see, and displays them at actual pixel coordinates on the computer's monitor.
The canvas can place windows anywhere, and can scroll to view windows placed off the screen.
Windows can be moved and resized. Windows have a solid background color for each block they
display within the grid system. Windows can additionally assign a default foreground color for
text (different from the workspace's default font color).
Windows contain a border of solid-colored grid elements, and a central document. The central
document contains rows of lines. Lines can be one of two types: [1] a simple line of character
objects to display and edit [2] or a header, which functions as a simple line, but additionally
has a sub-document grouped under it. Headers can fold (i.e. collapse
and hide their sub-document region, showing only their title) and unfold. Header titles
can be edited just like any other line. Sub-documents under headers can contain lines of either
type.
When the user selects a window, then activates it, the program shifts into line selection mode.
Once the desired line is selected, the user hits [CONTROL+ENTER] to shift from line selection
mode -> into editing mode. From here line characters can be typed, selected, copied, pasted, and
deleted as if typing in a standard text editor. [CONTROL+ENTER] likewise shifts back from text
editing mode -> back to line selection mode.
Lines store a linked-list of
character objects. Each character object has: a foreground color, a background color, references
to neighbors, and the symbol to display at its grid coordinate. (To
specifically differentiate, let's define "symbol" in this context to mean: a letter, number, or
any visible character which results from hitting a key on a keyboard.)
When the program draws to the screen, each grid element with a window will report what
is located at each blocky grid coordinate. Borders for windows tell the grid to paint a single
color at each pixel in that rectangle. Coordinates in a window which do contain a character
object report their block's background color and which foreground color the grid should paint
their symbol. When the character object tells the grid which symbol to draw, the grid looks up
that symbol in the font object.
The font object is a series of 2D regions I programmed manually. Each region has
elements containing 1's and 0's representing pixels in a rectangle. The 1's are the pixel
positions in the rectangle to draw the symbol, and the 0's represent where to draw the
background color. Each typeable character on the keyboard is mapped to one of the 2D regions in
the font array (fun example: the 2D region mapped to the space bar
is all 0's, resulting in an empty box; pure background color).
So the grid gets the foreground, the background, and the symbol data, then paints the pixels
onto the portion of the screen associated with that grid coordinate's region.
This process is repeated for each window and each line on the screen until... viola! You
have a screen with blocks and letters and colors.
Next up, how to use it.
Primary design rule for this application:
You should never have to take your hands off the keyboard nor move them out of typing
position (i.e. you'll never have to take your index
fingers off the [f] and [j] keys).
This lets you scroll around and view other windows.
The [A] and [Q] keys adjust the speed at which the canvas scrolls.
These controls are only deactivated when in typing mode. Otherwise they work no
matter where you are in selection mode.
The [IJKL] keys are for selection
across different contexts.
The [P] and [;] keys change the scope of what is selected (from high up canvas,
to low down character editing).
The [U] and [O] keys do a few different things at different levels, but it's
pretty straightforward.
[IJKL] keys select windows.
(The canvas will automatically scroll to
view any selected window if off-screen).
The [;] key activates the selected window.
The [P] key exits an active window and returns the scope to choosing
windows within the canvas.
The [U] key toggles "move the selected window" mode. Once on, the [IJKL]
keys nudge the window (pretend these are the
arrow keys). And pressing [U] again turns off move-mode.
The [O] key toggles "resize the selected window" mode. [IJKL] keys
resize the window. [I] and [K] shrink and expand the window vertically.
[J] and [L] shrink and expand the window horizontally. Pressing [O]
again turns off resize-mode.
the [I] and [k] keys allow you to select lines of text
the [J] and [L] keys fold and unfold headers
(if the current header is selected and
folded then [J] will select and scroll up to the header's parent).
the [U] and [O] keys go to
the next and previous header, respectively.
the ([) and ['] keys scroll the current window
(similar to how the [ESDF] keys scroll
the canvas)
the [P] key will deactivate the window and move selection up to the
canvas level.
the [;] key or [CTRL+ENTER] combo will activate the selected line (or
header) and the program shifts into text editing mode.
All keyboard inputs which normally type a character will insert a
character at the highlighted position.
The [ENTER] key will make a new line and move the highlighted position
to it. The window is scrolled down one line if the user presses [ENTER]
at the bottom of the window's viewable area.
[BACKSPACE], [DELETE], [HOME], [END], [PAGEUP], [PAGEDOWN], and the up
down left right [ARROW_KEYS] function as they do in regular text
editors, such as Notepad.
The shift key allows selecting a range of characters in a line (or
lines).
[CTRL+C] will copy characters if there is a selection.
[CTRL+V] will paste characters (replacing
any selected characters).
[CTRL+ENTER] will exit editing mode and return to line selection mode.
Nano is a minimalistic but fantastic command-line interface text
editor that can be found on most Linux distributions.
It uses a code library called ncurses, which
I initially used to build the first versions of this project. Ncurses basically lets you define
text and colors at positions on a grid, and it makes writing a text editor from (mostly scratch)
a breeze.
Later I was curious about how Linux displays images, simple graphics, and command line
terminals. So I began investigating the framebuffer.
In addition to using the framebuffer, I retrieved the hardware signals of my keyboard from
Linux in the form of scancodes. From there
I set up branches of code to account for how to react to different key presses and different
combinations.
This experiment was incredibly fun, and was my first foray into interacting with hardware on a
low level. Surprisingly, the biggest utility from this project was how it made me start thinking
about hardware and software in a more comprehensive way. It really bridged a gap for me between
my understandings of high level frameworks <-(&)-> the 1's and 0's that power, organize,
and encode everything above. And seeing a bit beneath the hood closer to the machine processes
has given me a lasting appreciation for the history of computing in general, and for all the
sub-processes that have been working inside my computers all my life.
AutoHotkey
TreeView Tasklist
Written in AutoHotkey (AHK).
Built on top of my AHK GUI Abstraction Framework.
I use this for planning out my day,
keeping track of large projects & requirements,
and to minimize clutter while brainstorming.
AutoHotkey
Scrolling Notes with Nested Windows
Demo coming soon.
AutoHotkey
GUI Abstration Framework
Functional, but not tidy and not comprehensive in coverage, currently on
the backburner.
This large framework powers the above two AutoHotkey projects.
This Website
A New Journey:
First time studying Web Design with HTML5 + CSS.
I'd never heard of the Jekyll static website builder
nor the Sphinx documentation generator when I started,
but I absolutely love both of these tools now.
Beginning with Jekyll and a Dream:
I had a basic idea in mind when I started, but I soon realized that if I wanted to
make each page have a consistent <header>
(the navigation bar and image at the very top),
then I would be duplicating a lot of code. Coming from my background of using low-level languages,
the notion of necessary code duplication was strange to me. But I was mainly worried about keeping
it all in sync.
Imagine this scenario. Say I were to start with a homepage and a <header>. Then I make a second page.
I copy the homepage's <header> code and paste it into the second page. Any time I create a new page, I
need to make sure it contains this code
(in order to have a consistent presentation as the
user navigates between pages).
If later I were to change even one part of the <header>, then I would have to
manually update the <header> code of each and every page to match that
change.
This approach is not efficient and the product would not be easy to maintain.
So I searched the internet. I read that there were tools for building
"static" websites, and I soon discovered
the Jekyll. If you need to make a website, but you're not using
a lot of JavaScript to dynamically insert content, I highly recommend Jekyll.
Briefly: Jekyll lets you define a basic layout, then you can wrap new pages inside the shared
layout. You can define multiple layouts, and use variables to (a) determine what content to
insert or (b) to generate content using your variables. It's awesome.
Code duplication exists once Jekyll bakes your website into an output directory. But in your source
files, you just write code once (and tell Jekyll where it should be inserted). Instead of
duplicating large sections, you just type {{ content }} or {% include
some_file.html %} and you're done!
For an example, here is a link to this page's content file on GitHub:
Apps.html. This is the file before Jekyll bakes it into the finished HTML page.
You'll notice this file doesn't contain a <header> tag. When Jekyll
bakes this Apps.html page, Jekyll takes the
Layout_Default.html file and pastes the Apps.html file into the
{{ content }} line inside Layout_Default.html.
Resulting in: the page you're looking at now!
If this is interesting to you,
or if you'd like more details, you can read my initial impressions of Jekyll in
[Blog Post #1].
I wanted to keep my <header> bar on my baked Documentation pages.
I needed to find a way to take the HTML structure which Sphinx outputs -> and make it
compatible with my Jekyll processing pipeline.
Automation:
After I discovered Sphinx, I had to be a little creative to make Sphinx's output files
compatible with the needs of Jekyll's input files.
I'm using Sphinx for the entire Documentation section, but I'm using Jekyll for all other pages.
To modify all my Sphinx-generated HTML files, I began automating a lot of manual tweaks and
insertions by utilizing Regular Expressions
for the first time.
Then I reached a point where AutoHotkey was malfunctioning when performing
Regular Expression replacements across huge files, so I began studying Python for the first
time. I ported my AutoHotkey automation into .py scripts, and it's been amazing ever since. Now I can run
these pre-processing and post-processing .py scripts from either Windows, or from my Debian
WSL2 command line.
Creating Code-Block Folding:
Recently, I wanted to add code-block folding to my Documentation section.
Sphinx was capable of fully highlighting my AutoHotkey code (after a few minor modifications), but had no support
for folding regions of code. So I wrote a pre-processing script in Python to manually insert
arbitrary tags near every open { curly brace and different arbitrary tags near
every close } curly brace.
I wrote a post-processing Python script to take the HTML
files which Sphinx generates, and replace my arbitrary tags with the HTML <details> element
(which has built-in functionality for collapsing/folding blocks of text). It was really different for me,
but pretty straightforward, and very fun.
You can try out my custom code-block folding here:
Then scroll to the bottom and click the box:
emulate_numpad.ahk
Short Writeup:
If you'd like to read more about the toolchains I use (and what my pre-processing
and post-processing scripts do) I've written a short overview on
this website's GitHub repository page.
In Summary:
I began this website with a portfolio concept, but I kept working on it because I really enjoyed it.